5 Inspiring Backyard Pond Designs

5 Inspiring Backyard Pond Designs

Water has always been an essential element of landscape design, adding tranquility, beauty, and life to outdoor spaces. A backyard pond not only enhances the aesthetic appeal of your garden but also supports biodiversity by attracting birds, frogs, dragonflies, and other wildlife. Whether you’re drawn to the elegance of a formal design or the charm of a natural oasis, backyard ponds offer endless creative possibilities.

In this article, we’ll explore five inspiring backyard pond designs that can transform your outdoor space into a peaceful retreat. Each design includes details on style, materials, plants, and practical tips to ensure your pond thrives for years to come.


1. The Natural Wildlife Pond

If your goal is to create a sanctuary for birds, frogs, butterflies, and other creatures, a natural wildlife pond is the perfect option. Designed to blend seamlessly with the surrounding landscape, these ponds often mimic the look of wild wetlands.

Key Features:

  • Shape and Layout: Irregular edges for a natural appearance.
  • Materials: Use pond liners hidden by gravel, stones, and native plants.
  • Plants: Cattails, water lilies, reeds, and marginal plants create habitats and oxygenate the water.
  • Wildlife Support: Gentle slopes make it easy for small animals to access the water.

Tips:

  • Avoid adding fish if you want frogs and insects to thrive, as fish often eat their eggs.
  • Place the pond in a partially shaded location to prevent algae growth.

This pond design not only beautifies your garden but also turns it into a thriving ecosystem.


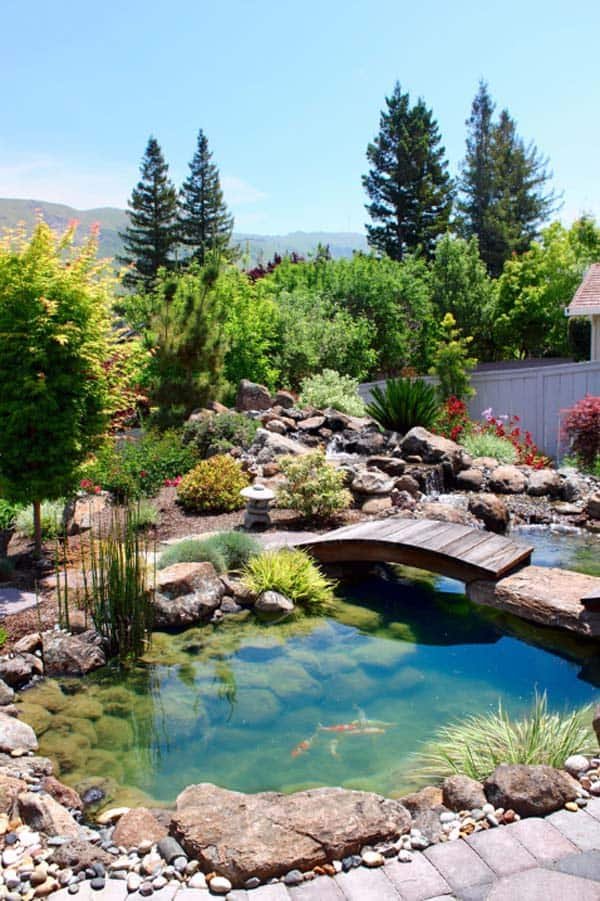
2. The Formal Koi Pond

For homeowners seeking elegance and sophistication, a koi pond is an outstanding choice. These ponds often serve as the centerpiece of a landscaped yard, offering beauty and serenity.

Key Features:

  • Shape and Layout: Rectangular or circular, often surrounded by stone or brick.
  • Materials: High-quality pond liners or concrete basins with filtration systems.
  • Plants and Decor: Lotus flowers, lilies, and ornamental features like fountains or statues.
  • Fish: Koi add vibrant color and movement.

Tips:

  • Install a reliable filtration system to maintain clean water and healthy fish.
  • Koi require depth (at least 3–4 feet) for proper growth and winter protection.
  • Use lighting around the pond to highlight its beauty at night.

This design combines water artistry with living beauty, making it a luxurious addition to any backyard.


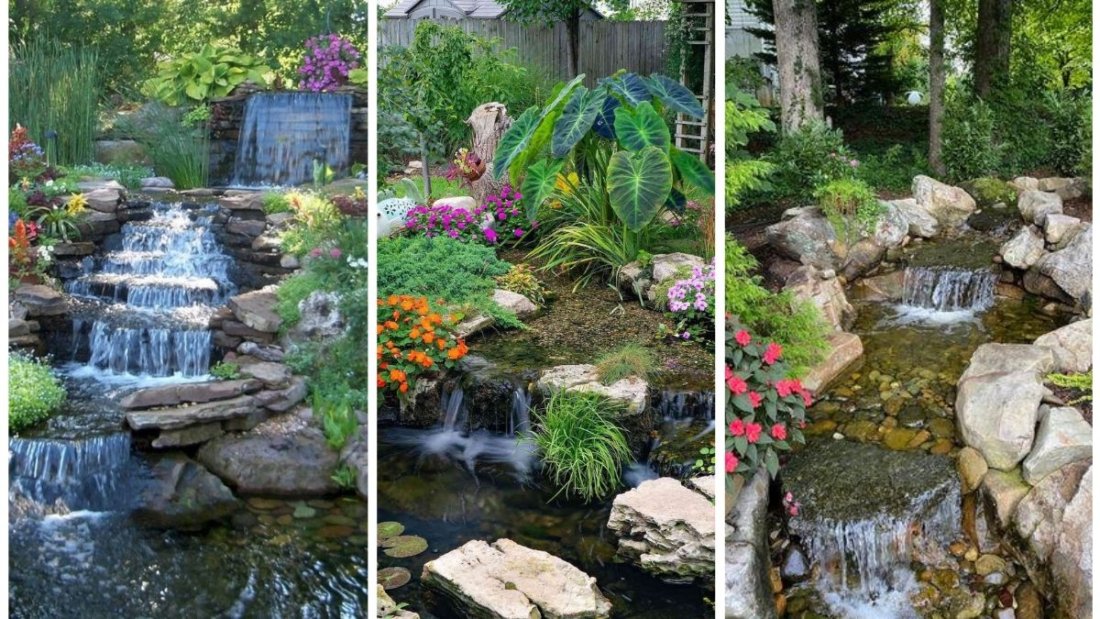
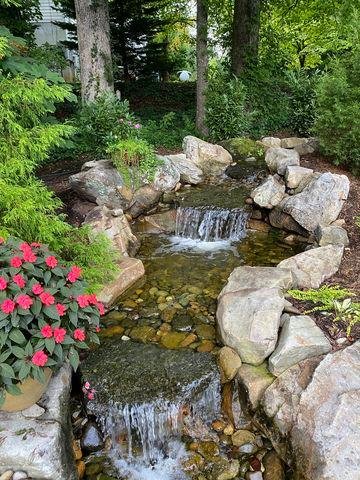
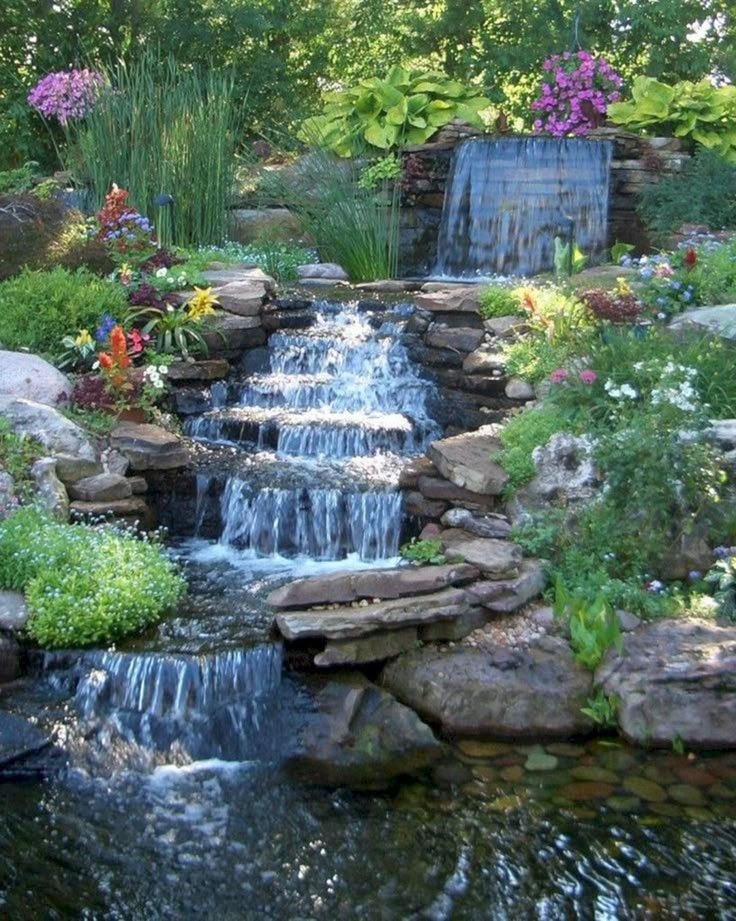
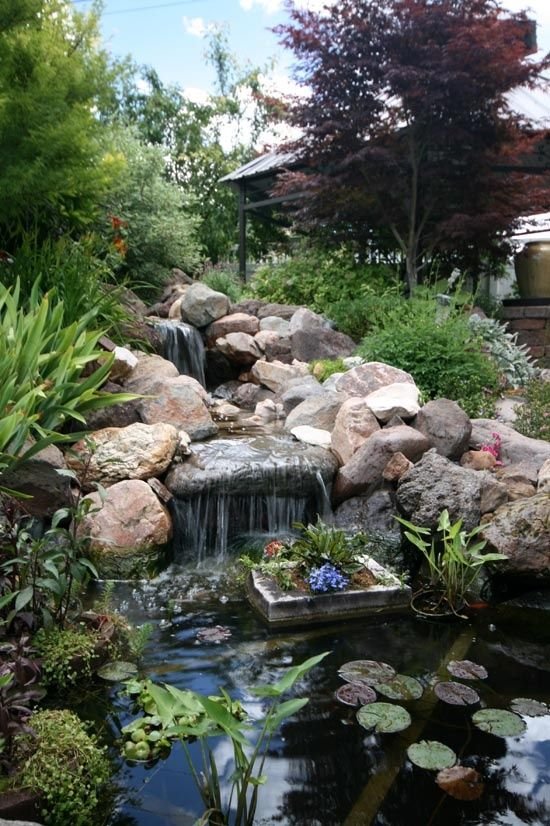
3. The Cascading Waterfall Pond

If the sound of moving water appeals to you, a cascading waterfall pond creates an enchanting atmosphere. The gentle trickle of water not only soothes the senses but also helps keep the pond oxygenated.

Key Features:

  • Shape and Layout: Freeform pond with a rock waterfall feature on one end.
  • Materials: Natural stones, pond pumps, and liners to prevent leaks.
  • Plants: Ferns, mosses, and water plants soften the edges.
  • Ambiance: Creates a dynamic, lively environment with sound and movement.

Tips:

  • Ensure the pump is powerful enough to maintain continuous water flow.
  • Use a variety of rock sizes for a more natural appearance.
  • Consider solar-powered pumps for eco-friendly operation.

This type of pond adds drama and energy to your garden while doubling as a natural humidifier during hot summers.


4. The Minimalist Modern Pond

For contemporary gardens, a minimalist pond design emphasizes clean lines, symmetry, and subtle elegance. These ponds often resemble reflecting pools, making them ideal for homes with modern architectural styles.

Key Features:

  • Shape and Layout: Geometric shapes such as squares or rectangles.
  • Materials: Concrete, steel edging, and smooth stone finishes.
  • Plants and Decor: Limited use of plants—water lilies or single ornamental grasses for a sleek look.
  • Ambiance: Often paired with sculptures, LED lighting, or a simple fountain.

Tips:

  • Keep the design uncluttered to maintain its minimalist charm.
  • Use clear water and a simple color palette for maximum effect.
  • Incorporate seating nearby for a stylish outdoor lounge area.

A modern pond turns your backyard into a sophisticated oasis with an artistic touch.


5. The Rustic Farmhouse Pond

For a cozy, country-inspired feel, a rustic pond brings a charming, old-world vibe to your yard. These ponds often feature reclaimed materials and natural elements, creating a relaxed and inviting atmosphere.

Key Features:

  • Shape and Layout: Organic, freeform shapes with surrounding wildflowers.
  • Materials: Wooden bridges, stone borders, or barrels as mini-ponds.
  • Plants: Irises, hostas, water hyacinths, and wildflowers for a natural look.
  • Extras: Add a wooden bench, small dock, or stepping stones for a homely appeal.

Tips:

  • Incorporate native plants for a low-maintenance, eco-friendly design.
  • Small rustic ponds can be created even in barrels or tubs for patios.
  • Surround with flowering plants to attract bees and butterflies.

This design is ideal for homeowners who want their garden to feel warm, natural, and full of life.


Practical Considerations for Any Pond Design

No matter which style you choose, several practical factors should be considered:

  1. Location: Choose a spot with partial sun and shade. Too much sunlight encourages algae growth.
  2. Depth: Deeper ponds support fish and withstand seasonal changes better.
  3. Filtration: A good filter ensures clear water and healthy aquatic life.
  4. Safety: For households with children or pets, include shallow edges or safety barriers.
  5. Maintenance: Regularly remove debris, prune plants, and check pumps and liners.

Conclusion

A backyard pond is more than just a water feature—it’s a living work of art that can bring peace, beauty, and biodiversity to your home. Whether you prefer the natural charm of a wildlife pond, the sophistication of a koi pond, the energy of a cascading waterfall, the elegance of a modern design, or the coziness of a rustic farmhouse pond, there’s a style to match every taste and landscape.

By considering your yard’s size, budget, and maintenance preferences, you can create a stunning pond that transforms your outdoor space into a personal retreat. With the right design, your backyard pond will not only delight your senses but also become a thriving habitat for nature.

How to Build a Natural Rock Border

How to Build a Natural Rock Border

Natural rock borders are one of the most versatile and timeless landscaping features you can add to your yard or garden. Whether you want to define flower beds, create pathways, edge a lawn, or prevent soil erosion, rock borders provide both function and beauty. Unlike plastic or manufactured edging materials, natural stones blend seamlessly with the environment, adding rustic charm while requiring minimal maintenance.

Building a rock border may seem like a complex task, but with the right planning and step-by-step approach, it becomes an enjoyable DIY project. In this guide, we’ll explore the benefits of rock borders, the tools and materials you’ll need, and a detailed process to build one successfully.


Why Choose a Natural Rock Border?

Before you start gathering rocks and digging into your yard, it’s helpful to understand why natural rock borders are such a great choice.

  1. Durability: Rocks don’t rot, warp, or degrade like wood or plastic. They can withstand weather extremes for decades.
  2. Low Maintenance: Once installed, rock borders require very little upkeep beyond occasional cleaning or resetting.
  3. Aesthetic Appeal: Stones give a natural, rustic, and timeless look that complements any garden style.
  4. Versatility: Rock borders can define flower beds, walkways, ponds, driveways, or even vegetable gardens.
  5. Eco-Friendly: Unlike synthetic edging materials, natural rocks are sustainable and blend seamlessly with the environment.
  6. Erosion Control: Rocks help retain soil and prevent mulch from washing away during heavy rains.

With so many advantages, it’s easy to see why natural rock borders remain a favorite choice for gardeners and landscapers alike.


Step 1: Plan Your Rock Border

The success of your project begins with careful planning.

  • Decide the Purpose: Are you edging a flower bed, walkway, or lawn? The purpose will determine the size, height, and style of the rock border.
  • Sketch the Layout: Use paper to draft your border shape. Curves often look more natural than straight lines.
  • Mark the Area: In your yard, mark the outline with spray paint, garden hoses, or stakes and string.
  • Consider Style: Do you want a rustic, irregular look with varied rock sizes or a more formal design with uniform stones?

A clear plan ensures you gather the right materials and avoid unnecessary work later.


Step 2: Gather Materials and Tools

Having the right supplies makes the process smoother and more efficient.

Materials:

  • Natural Rocks or Stones – Choose stones that match your style (fieldstone, river rock, flagstone, or slate).
  • Landscape Fabric – Prevents weeds from growing between rocks.
  • Gravel or Sand – Provides a stable base.
  • Soil or Mulch – For filling in gaps around your border.

Tools:

  • Shovel
  • Garden hoe or rake
  • Rubber mallet (to adjust rocks)
  • Level (for even placement)
  • Wheelbarrow (for transporting rocks)
  • Work gloves (for protection)

Step 3: Choose the Right Rocks

Not all rocks are created equal for borders. The type of rock you select should complement your garden style and intended purpose.

  • Fieldstone: Rough and irregular, perfect for rustic and natural looks.
  • River Rock: Smooth and rounded, great for informal borders or pathways.
  • Flagstone/Slate: Flat rocks that create a polished and uniform appearance.
  • Boulders: Larger stones used as focal points or for sturdy, tall borders.

Tip: When selecting rocks, try to stay consistent in color and texture for a cohesive design.


Step 4: Prepare the Site

Proper site preparation ensures stability and longevity for your rock border.

  1. Clear the Area – Remove grass, weeds, and debris along your marked line.
  2. Dig a Trench – Dig about 4–6 inches deep and as wide as your largest rock. This trench will hold your rocks securely.
  3. Add Base Layer – Fill the trench with a few inches of gravel or sand. This provides drainage and prevents rocks from shifting.
  4. Lay Landscape Fabric – Place fabric over the trench and surrounding area to stop weeds from growing through your border.

Step 5: Lay the Rocks

This step brings your border to life.

  1. Start with Larger Stones – Place the biggest rocks first as a foundation. Position them snugly in the trench.
  2. Align and Adjust – Use a rubber mallet to tap rocks into place. Ensure they sit firmly and don’t wobble.
  3. Stagger Placement – Like bricks, stagger rocks to create stability. Avoid lining up vertical seams.
  4. Fill Gaps – Use smaller rocks, soil, or gravel to fill spaces between larger stones.
  5. Check for Level – Use a level to keep the border consistent, especially if edging walkways or lawns.

Step 6: Build Layers (Optional)

For taller borders or raised flower beds, you may want to stack rocks in multiple layers.

  • First Layer: The foundation layer should be partially buried for stability.
  • Second Layer: Place stones so they overlap joints from the first layer, similar to a brick wall.
  • Backfill Soil: Add soil or gravel behind the rocks to reinforce the wall.

Two to three layers are usually enough for most garden borders.


Step 7: Finish and Beautify

Once the rocks are in place, finish the project with details that enhance its look and function.

  • Backfill with Soil or Mulch: Fill the inside of your border with topsoil or mulch to complete flower beds or pathways.
  • Add Plants: Plant low-growing flowers, ground covers, or ornamental grasses near the border to soften edges.
  • Accent Lighting: Solar lights placed along the rock border can highlight its beauty at night.
  • Clean Rocks: Rinse stones with water to remove dirt and dust for a polished appearance.

Maintenance Tips for Rock Borders

Rock borders are low-maintenance, but a little care keeps them looking their best:

  1. Weed Control: Check occasionally for weeds that sneak through gaps. Pull them promptly.
  2. Reset Rocks: Over time, rocks may shift due to soil movement or weather. Reposition them as needed.
  3. Clean Annually: Wash rocks with a hose or pressure washer to remove moss or dirt buildup.
  4. Replenish Mulch or Gravel: Add fresh mulch or gravel each year to maintain neatness.

Design Ideas for Rock Borders

Here are a few creative ways to use natural rock borders in your landscaping:

  • Flower Bed Edging: Frame colorful perennials with a rustic rock border for contrast.
  • Walkway Borders: Line garden paths with smooth river rocks for a natural guide.
  • Pond or Water Feature: Use rocks to edge a pond or fountain, blending it into the landscape.
  • Raised Beds: Stack flagstone or fieldstone to build elevated garden beds.
  • Driveway Edging: Use large stones to mark boundaries and prevent erosion along driveways.

Benefits Beyond Beauty

Building a natural rock border isn’t just about aesthetics. It also brings practical advantages:

  • Prevents Mulch Runoff: Rocks keep mulch and soil in place during heavy rains.
  • Defines Spaces: Borders clearly separate lawn areas from garden beds or walkways.
  • Wildlife Habitat: Small gaps between rocks create microhabitats for insects, frogs, and lizards, promoting biodiversity.
  • Adds Value: Thoughtful landscaping increases curb appeal and property value.

Final Thoughts

Building a natural rock border is an excellent way to combine functionality with natural beauty in your outdoor space. With careful planning, the right materials, and step-by-step installation, you can create borders that not only last for decades but also elevate your garden’s charm.

Whether you’re edging flower beds, defining pathways, or preventing soil erosion, natural rocks offer a timeless solution. Their durability, low maintenance, and rustic appeal make them one of the best landscaping investments you can make.

So gather your rocks, grab your tools, and start shaping your outdoor space with a natural rock border—it’s a DIY project that pays off in both beauty and practicality.

5 Easy Landscaping Ideas for Front Yards

5 Easy Landscaping Ideas for Front Yards

Your front yard is the first thing people notice when they arrive at your home, and it sets the tone for your property’s overall curb appeal. A beautifully landscaped front yard doesn’t just impress visitors—it can also boost property value and create a welcoming space for you and your family.

The good news is that you don’t need to be a professional landscaper or spend a fortune to transform your front yard into a stunning outdoor area. With the right ideas and thoughtful planning, you can achieve a gorgeous, low-maintenance, and functional front yard. In this article, we’ll explore five easy landscaping ideas for front yards that will enhance your home’s exterior charm without overwhelming your budget or schedule.


1. Create a Welcoming Pathway

A well-designed pathway leading to your front door adds structure, functionality, and beauty to your front yard. It serves as a visual guide for visitors while providing a sense of direction and order to the overall landscape design.

Design Options for Pathways:

  • Stone or Paver Walkways: Natural stone, brick, or concrete pavers offer durability and a polished look. They can be laid in simple straight lines or creative patterns.
  • Gravel Paths: Affordable and easy to install, gravel creates a rustic and charming feel. Adding stepping stones can elevate the look.
  • Curved Walkways: Instead of a straight path, try a gentle curve leading to the entrance. This adds elegance and makes the yard look larger.

Enhancement Ideas:

  • Line your pathway with solar lights for evening illumination.
  • Add border plants like lavender, boxwood, or ornamental grasses for a soft touch.
  • Incorporate seasonal flowers along the walkway to add year-round color.

A pathway doesn’t just guide visitors—it sets the stage for what lies ahead and immediately makes your home look more inviting.


2. Add Low-Maintenance Flower Beds

Flower beds bring vibrant colors and textures that breathe life into any front yard. The best part is that you don’t need complex designs to create stunning results—strategically placed flower beds can do wonders.

Steps to Create Flower Beds:

  1. Choose the Right Location – Pick sunny spots since most flowering plants need 6–8 hours of light daily.
  2. Plan the Shape – Curved or circular flower beds often look more natural than rigid square designs.
  3. Pick Easy-to-Grow Plants – Select low-maintenance perennials like black-eyed Susans, coneflowers, daylilies, and hydrangeas. These provide beauty without constant replanting.

Pro Tips:

  • Layer Plants by Height: Place taller plants at the back, medium-height plants in the middle, and shorter plants at the front for a well-balanced design.
  • Use Mulch: Mulching helps retain moisture, suppress weeds, and gives flower beds a neat, finished appearance.
  • Choose Seasonal Interest Plants: Include a mix of spring bloomers (tulips, daffodils), summer performers (zinnias, cosmos), and fall beauties (asters, chrysanthemums).

Flower beds are one of the easiest and most cost-effective ways to enhance your front yard while offering flexibility to experiment with colors and textures.


3. Incorporate Shrubs and Small Trees

If you want structure and greenery that lasts year-round, shrubs and small ornamental trees are excellent landscaping additions. They anchor your yard, provide natural privacy, and make your front yard look fuller without overwhelming the space.

Best Shrubs for Front Yards:

  • Boxwood – Classic, evergreen, and great for borders or hedges.
  • Azaleas – Provide brilliant seasonal color in spring.
  • Hydrangeas – Large, colorful blooms that thrive in partial shade.

Small Ornamental Trees to Try:

  • Dogwood – Stunning spring flowers and attractive fall foliage.
  • Japanese Maple – Known for its delicate leaves and vibrant colors.
  • Crape Myrtle – Blooms throughout summer and requires minimal care.

Tips for Planting Shrubs and Trees:

  • Place them strategically near the house to frame the entryway without blocking windows.
  • Use them as focal points in the landscape, especially in corners of the yard.
  • Mix evergreen and deciduous varieties to ensure beauty throughout the year.

With shrubs and ornamental trees, you’re adding both texture and permanence to your front yard design.


4. Add Decorative Elements and Garden Accents

Landscaping isn’t just about plants—it’s also about incorporating features that reflect your personality and style. Adding small decorative elements can instantly enhance the overall appeal of your front yard.

Popular Garden Accents:

  • Water Features: A small fountain or birdbath adds movement, sound, and attracts birds and butterflies.
  • Garden Statues or Ornaments: These create focal points and can range from modern sculptures to traditional designs.
  • Planters and Pots: Colorful ceramic or terracotta pots filled with seasonal flowers can frame your porch or walkway beautifully.
  • Outdoor Lighting: Solar-powered stake lights, lanterns, or string lights can create a warm and inviting glow at night.

Integration Tips:

  • Keep accents minimal—too many decorations can make the space look cluttered.
  • Position garden accents strategically where they enhance rather than distract from your home’s features.
  • Match decorative elements with your home’s architectural style for a cohesive look.

These additions provide personality and character, ensuring your front yard feels unique and welcoming.


5. Keep It Green with Lawn and Ground Covers

A lush, well-kept lawn is often the centerpiece of a front yard. However, maintaining a perfect lawn can be time-consuming. An easy landscaping solution is to strike a balance by combining traditional grass areas with low-maintenance ground covers.

Lawn Care Basics:

  • Mow Regularly: Keep grass height even to maintain neatness.
  • Water Smartly: Water early in the morning to reduce evaporation.
  • Fertilize Naturally: Use compost or organic fertilizers to avoid chemicals.

Low-Maintenance Ground Covers:

  • Creeping Thyme – Hardy, fragrant, and produces tiny flowers.
  • Sedum – Drought-tolerant and grows well in poor soil.
  • Clover – Eco-friendly alternative to grass that requires less water.
  • Hostas – Perfect for shady areas with lush, green leaves.

By mixing grass with hardy ground covers, you can reduce upkeep while still keeping your front yard green and inviting.


Additional Tips for Easy Front Yard Landscaping

  1. Plan Before Planting: Sketch a rough layout of your yard to visualize plant placement and flow.
  2. Start Small: Tackle one area at a time rather than trying to redesign the entire yard at once.
  3. Use Native Plants: Native species are easier to maintain, adapt better to local climates, and attract pollinators.
  4. Focus on Symmetry: Balanced designs, such as matching plants on both sides of a pathway, create a clean, elegant look.
  5. Think Long-Term: Choose plants and features that will grow with time and continue enhancing your yard for years to come.

Final Thoughts

Landscaping your front yard doesn’t have to be expensive, overwhelming, or time-consuming. By focusing on simple, effective ideas like welcoming pathways, colorful flower beds, shrubs and trees, decorative accents, and green lawns or ground covers, you can completely transform your home’s exterior.

The key is to create a balance between beauty and practicality. A well-thought-out front yard not only boosts curb appeal but also provides you with a space you’ll enjoy every day. With these five easy landscaping ideas, you’ll be on your way to crafting a stunning front yard that leaves a lasting impression—without draining your energy or budget.

5 DIY Garden Fence Ideas You Can Try

5 DIY Garden Fence Ideas You Can Try

A garden fence is more than just a boundary for your outdoor space—it’s a functional and decorative element that adds character, privacy, and protection to your garden. While store-bought fences are convenient, building your own DIY garden fence gives you the chance to get creative, save money, and add a personal touch to your outdoor haven.

Whether you want a rustic wooden border, a whimsical fairy-tale vibe, or a modern minimal look, there are plenty of DIY ideas to explore. Below are five creative garden fence ideas you can easily try at home, along with step-by-step tips to bring them to life.


1. Rustic Wooden Pallet Fence

Pallets are an affordable and eco-friendly option for building a simple garden fence. They’re readily available, easy to work with, and can create a charming rustic look.

Materials Needed:

  • Wooden pallets (reclaimed or new)
  • Nails or screws
  • Hammer or drill
  • Sandpaper (optional)
  • Paint or wood stain (optional)

Steps to Build:

  1. Collect enough pallets to cover the area you want fenced.
  2. Sand the pallets to smooth rough edges and prevent splinters.
  3. Stand the pallets upright side by side and secure them together with nails or screws.
  4. For added stability, drive wooden stakes into the ground and attach the pallets to them.
  5. Leave them natural for a rustic look or paint them for a colorful garden accent.

Why It Works:
Pallet fencing is perfect for small gardens or vegetable patches. It’s low-cost, eco-friendly, and can be customized with planters, hanging pots, or even painted designs for extra flair.


2. Bamboo Privacy Fence

If you’re looking for a natural and tropical vibe, bamboo fencing is a fantastic choice. Bamboo is durable, lightweight, and blends beautifully with greenery.

Materials Needed:

  • Bamboo poles or bamboo rolls
  • Garden stakes or posts
  • Wire, zip ties, or strong twine
  • Saw (if cutting bamboo to size)

Steps to Build:

  1. Place sturdy stakes or posts in the ground along the perimeter of your garden.
  2. Arrange bamboo poles vertically or horizontally against the posts.
  3. Tie the bamboo securely to the stakes using wire or twine.
  4. Trim the top for a neat, even finish, or leave it irregular for a more rustic, organic look.

Why It Works:
Bamboo fencing adds a sense of privacy and elegance without feeling too heavy or closed off. It’s ideal for patio gardens, meditation corners, or spaces where you want a bit of seclusion while still maintaining an airy feel.


3. Woven Willow Fence

Woven fences have been used for centuries and bring an old-world charm to gardens. They’re surprisingly easy to make with flexible branches like willow, hazel, or even young saplings.

Materials Needed:

  • Willow or hazel branches
  • Wooden stakes
  • Pruning shears

Steps to Build:

  1. Hammer sturdy stakes into the ground about 1–2 feet apart.
  2. Collect long, flexible willow or hazel branches.
  3. Begin weaving the branches in and out of the stakes, alternating each row to create a basket-like pattern.
  4. Push each row down tightly for a firm, durable structure.
  5. Trim the ends for a tidy look.

Why It Works:
A woven willow fence is both sustainable and beautiful. It works especially well for cottage-style gardens, herb patches, or flower borders. The texture adds interest, and over time, the wood weathers naturally to blend with the landscape.


4. Recycled Metal Fence

For a quirky and eco-conscious option, try building a fence out of recycled metal items such as old roofing sheets, tin, or corrugated panels. This gives your garden an industrial yet artistic flair.

Materials Needed:

  • Corrugated metal sheets or recycled metal pieces
  • Wooden posts or metal poles
  • Screws and a drill

Steps to Build:

  1. Set posts firmly into the ground to create the structure.
  2. Attach the corrugated metal sheets or panels to the posts using screws.
  3. Alternate colors or arrange panels at different heights for a creative effect.
  4. You can also paint or stencil designs on the metal for a personalized touch.

Why It Works:
Recycled metal fences are durable and weather-resistant. They’re a great choice if you want to protect your garden from animals or add a unique, artsy vibe to your space. Plus, repurposing materials reduces waste and costs.


5. Living Fence with Climbing Plants

If you prefer a green, eco-friendly option, consider creating a living fence with climbing plants. Using a simple trellis, wire frame, or wooden posts, you can grow vines that form a natural barrier over time.

Materials Needed:

  • Trellis, wire fencing, or wooden posts with netting
  • Fast-growing climbing plants (ivy, honeysuckle, morning glory, or jasmine)
  • Garden soil and compost
  • Watering can or hose

Steps to Build:

  1. Install the trellis or wire frame along the area where you want your fence.
  2. Plant climbing vines at the base of the structure, spacing them evenly.
  3. Guide young vines by tying them gently to the frame with garden twine.
  4. Water regularly and trim as needed to encourage thick, bushy growth.

Why It Works:
Living fences are not only eco-friendly but also provide shade, attract pollinators, and improve air quality. They bring a soft, lush feel to the garden and can be scented with flowering vines like jasmine or honeysuckle.


Tips for Choosing the Right DIY Fence

When deciding which fence idea is right for your garden, consider these factors:

  • Purpose: Do you want privacy, decoration, or protection from animals?
  • Budget: Pallets and recycled materials are cost-effective, while bamboo or metal may require a higher investment.
  • Style: Choose a fence that complements your home and garden design (rustic, modern, cottage-style, etc.).
  • Durability: If you live in a windy or rainy area, sturdier options like woven willow or metal may last longer.
  • Maintenance: Living fences require regular care, while pallet or bamboo fences are relatively low-maintenance.

Conclusion

A DIY garden fence is more than just a boundary—it’s an opportunity to express creativity and bring unique character to your outdoor space. From the rustic charm of pallet fences to the eco-friendly elegance of living plant walls, the possibilities are endless.

By trying one of these five DIY garden fence ideas, you’ll not only save money but also add a personal touch that store-bought fences simply can’t offer. Whether you’re aiming for practicality, beauty, or both, the right fence can truly transform your garden into a welcoming, magical space.

How to Build a Raised Garden Bed Step-by-Step

How to Build a Raised Garden Bed Step-by-Step

Gardening is one of the most rewarding hobbies, but it can also come with its challenges—poor soil quality, weeds, pests, and back strain from bending too much. One solution that addresses all of these issues is the raised garden bed. Raised beds not only add structure and beauty to your yard but also make gardening more efficient, comfortable, and productive.

Whether you’re a beginner or an experienced gardener, building your own raised garden bed is a straightforward project that can be completed in a single afternoon. In this step-by-step guide, we’ll walk you through everything you need to know—from choosing the right location and materials to constructing and filling your bed. By the end, you’ll be ready to plant a thriving, organized, and low-maintenance garden.


Why Choose a Raised Garden Bed?

Before diving into the steps, it’s worth understanding the benefits of raised beds:

  • Improved soil quality: You control the soil mix, ensuring it’s fertile, well-draining, and ideal for your plants.
  • Fewer weeds: Weeds are easier to manage and less likely to invade.
  • Better drainage: Raised beds prevent waterlogging, protecting roots.
  • Extended growing season: Soil warms up earlier in spring and retains heat longer in fall.
  • Accessibility: Raised beds reduce bending and strain, making gardening easier for everyone.
  • Pest control: Elevating plants can deter certain ground-dwelling pests.

With these advantages, it’s easy to see why raised garden beds are popular among home gardeners.


Step 1: Choose the Right Location

A raised bed should be placed where your plants will thrive.

  • Sunlight: Most vegetables and flowers need at least 6–8 hours of direct sunlight daily. Choose a sunny spot.
  • Water access: Place your bed close to a water source for easy irrigation.
  • Level ground: While you can build on a slope, a flat area makes construction easier.
  • Accessibility: Ensure the bed is easy to reach from all sides without stepping into it.

Pro Tip: If possible, orient your bed north-to-south for maximum sunlight exposure.


Step 2: Decide on Size and Shape

When it comes to raised beds, size matters—for both plant health and your convenience.

  • Width: Keep the bed 3–4 feet wide so you can reach the center from either side.
  • Length: Beds can be as long as you want, but 6–8 feet is manageable.
  • Depth: 12–18 inches is ideal for most crops, but even 6 inches can work for shallow-rooted plants.

Raised beds can be rectangular, square, L-shaped, or even circular depending on your space and creativity.


Step 3: Gather Materials and Tools

Materials:

  • Untreated wood planks (cedar or redwood are rot-resistant) OR alternative materials like stone, concrete blocks, or metal.
  • Galvanized screws or nails.
  • Landscape fabric (optional, for weed control).
  • Soil mix (a blend of topsoil, compost, and organic matter).

Tools:

  • Saw (if cutting wood).
  • Drill or hammer.
  • Measuring tape.
  • Carpenter’s square (for corners).
  • Shovel or rake.

Pro Tip: Avoid treated lumber, as the chemicals may leach into your soil.


Step 4: Prepare the Ground

Clear the area where your bed will sit.

  • Remove grass, weeds, and rocks.
  • Level the ground with a rake.
  • Lay down cardboard or landscape fabric if you want extra weed protection.

This preparation step ensures your bed has a solid foundation.


Step 5: Build the Frame

Now comes the fun part—construction!

  1. Measure and cut wood to your desired dimensions.
  2. Assemble the sides: Place the boards upright to form a rectangle. Use a carpenter’s square to ensure corners are at 90 degrees.
  3. Secure with screws: Drill 2–3 screws at each corner to hold the boards together. For taller beds, stack multiple layers of boards and secure them with corner posts.
  4. Check alignment: Place the frame in position and make sure it’s level.

If using stone or blocks, stack them in layers, ensuring stability.


Step 6: Place and Secure the Bed

Position your frame in the prepared area. For added durability:

  • Drive wooden stakes or metal brackets at the corners and screw them into the frame for extra support.
  • If desired, staple landscape fabric along the inside walls to prevent soil erosion through cracks.

Step 7: Fill the Bed with Soil

The soil you choose is the key to your garden’s success. A raised bed should be filled with a nutrient-rich, well-draining mix.

Recommended mix (per 1 cubic yard):

  • 50% topsoil
  • 30% compost
  • 20% peat moss, coconut coir, or vermiculite for aeration

Layer the soil evenly, raking as you go. Fill to within 1–2 inches of the top to allow space for watering.

Pro Tip: Refresh the soil with compost each season to maintain fertility.


Step 8: Plant Your Garden

Now that your raised bed is ready, it’s time to plant!

  • Plan your layout: Tall crops like tomatoes should go in the back, with shorter plants like lettuce in front.
  • Practice crop rotation: Rotate plant families each season to prevent soil depletion and pest buildup.
  • Companion planting: Pair compatible plants (e.g., basil near tomatoes, carrots with onions) to maximize space and reduce pests.

Raised beds are especially great for vegetables, herbs, and flowers that need consistent soil conditions.


Step 9: Maintain Your Raised Garden Bed

Building your raised bed is just the beginning. To keep it productive:

  • Water regularly: Raised beds dry out faster than in-ground gardens. Drip irrigation or soaker hoses work best.
  • Mulch: Apply organic mulch (straw, shredded leaves, or wood chips) to retain moisture and suppress weeds.
  • Fertilize organically: Add compost or natural fertilizers like fish emulsion or seaweed extract.
  • Weed control: Pull weeds promptly before they spread.
  • Seasonal care: In winter, cover your bed with mulch or a tarp to protect the soil.

Creative Variations of Raised Beds

Raised beds don’t have to be boring! Consider these unique twists:

  • Tiered raised beds: Great for sloped yards and adding visual interest.
  • Metal beds: Durable and modern-looking.
  • Stone or brick beds: Rustic and long-lasting.
  • Vertical raised beds: Add trellises for climbing crops like beans and cucumbers.
  • Portable raised beds: Use large containers or build beds with wheels for small spaces.

Your raised bed can be as functional or decorative as you like.


Common Mistakes to Avoid

  • Using treated wood: Can leach harmful chemicals.
  • Making the bed too wide: You shouldn’t have to step inside, as this compacts the soil.
  • Poor soil mix: Avoid filling with only garden soil—it compacts easily and drains poorly.
  • Neglecting watering needs: Raised beds dry out quicker, so monitor moisture levels.
  • Skipping crop rotation: Planting the same crop repeatedly invites pests and depletes nutrients.

Avoiding these mistakes will save you frustration and ensure long-term success.


Final Thoughts

Building a raised garden bed is one of the best projects you can do to improve your gardening experience. With just a few tools, some simple materials, and a little effort, you’ll create a productive, organized, and beautiful space for growing vegetables, herbs, or flowers.

The best part? Raised beds give you greater control over your garden—better soil, fewer weeds, and healthier plants—all while making gardening more enjoyable. Whether you’re working with limited yard space or simply want a more efficient way to garden, raised beds are a practical and rewarding solution.

So, gather your tools, follow these steps, and start building your raised garden bed today. You’ll be harvesting fresh, homegrown produce before you know it!